
|
Pasta is often considered the center of an Italian menu. But in Northern Italy, where the short grained Arborio rice is grown, the rice becomes the star and is made into wonderful risottos. Arborio rice becomes creamy as it releases its particularly high starch content as the broth is slowly stirred into the rice. It seems to me to be a wonderful expression of the Italian preference for high quality, slow food as compared to low quality, fast food. (See the movie, The Big Night, for an entertaining depiction of the cultural clash between American and Italian ways of eating.) Risotto is a very versatile dish, taking on the flavors of the type of broth and other ingredients added. Though there are wonderful risotto recipes that include various vegetables, meats, and seafood, the one given here is simpler and may be used along with a meat dish to create a lovely meal. Traditionally in the Italian cuisine, it is often a first course or "primi", which is how it is used in the menu you can find on my website. Have you tried this? Do you have a favorite variation? Leave a comment - let others know what you think.
1. Put broth in a saucepan and bring to simmer. 2. Dice the onion 3. Put 2 tablespoons of butter in a second pot and heat to moderate temperature. Add chopped onion to heated butter. Saute for 1 to 2 minutes until softened, but not browned. 4. Measure rice and and add to onions. Using the wooden spoon, stir for 1 minute, making sure all the grains are well-coated. 5. Begin to add the simmering broth, ½ cup at a time, stirring frequently. Wait until each addition is almost completely absorbed before adding the next ½ cup, reserving about ¼ cup to add at the end. Stir frequently to prevent sticking. 6. After approximately 18 minutes, when the rice is tender but still firm, add the reserve broth, cream, and peas and stir well. 7. Turn off the heat and immediately add the rest (1 Tablespoon) of butter and Parmesan and stir vigorously to combine with the rice. 8. Serve immediately. #stonesoupblog, #italian cuisine, #risotto
2 Comments
Including fruits in your diet has many health benefits. A delightful way to enjoy fruits is to make a crisp. It's a perfect dessert, easy to make, and tastes great. Unlike many other baked desserts, ingredients do not have to be precise. You can choose a favorite fruit combination and if you add a little more or less than the recipe calls for, it really won't make a big difference. In the following recipe, if you have lovely fresh peaches and blueberries, that's great. But if those great fresh fruits are not available, frozen fruits work and even canned ones in their own juice will give a wonderful tasty result. Another bonus is that this crisp, depending on the fat used in the topping, is acceptable for vegans as well. In the following recipe, I've given precise ingredients and amounts which you can count on for an easy and great dessert, but I'd love to have you comment and let me know if you enjoyed it or if you altered it.  Blueberry Peach Crisp Ingredients: 2 cans (29 ounces sliced peaches) in their own juice 2 cups fresh or frozen blueberries 2/3 cup brown sugar, divided 5/8 cup flour, divided 3 teaspoons cinnamon, divided 1 1/2 cup of quick cooking oats 3 Tablespoon butter, oil, or favorite spread Directions for Proceeding: 1. Drain peaches in colander and mix with berries in a large bowl. (Frozen berries do best in semi-thawed state.) 2. Combine in small bowl, 1/3 cup brown sugar, 1/4 cup flour, 2 teaspoons of cinnamon. 3. In a large bowl coat fruit well with flour mixture and put into the baking dish. 4. In medium bowl combine oats, 3/8 cup flour, 1/3 cup brown sugar, and 1 teaspoon of cinnamon. 5. Add the softened spread and mix well. (Use pastry blender or clean hands.) 6. Spread the dry ingredients evenly over fruit. 7. Bake a 350 degrees for 30 minutes or until bubbly. Cover with foil after 20 minutes if the top is too brown. 8. Serve warm with a frozen topping if desired. Serves 6 So, what do you think? Will you use this recipe as written or change it? Please comment and let me know!
 There is little doubt that it is easier to make a meal for kids than to have them help. So why include them in this process? The reason is that there are many benefits you can reap from involving your children in making a meal. Benefit #1. Both you and your kids will be working together on a project that has immediate rewards. The importance of this project, includes not only the meal, but the special time you have working together. Benefit #2. Your child will be learning an important life skill, which, I've learned in my work as a dietitian, many people don't have. I've had people say that they cooked supper and meant they had put a frozen pizza in the oven! Benefit #3. Your child may be willing to try some new foods. Benefit #4. Your child will learn that special meals are not just restaurant ones, and that can be financially beneficial. Benefit #5. Most meals made at home have much less salt and fat than those eaten out and can help keep the weight of both you and your kids in the normal range. I think the benefits are best realized when the adults take the role of the "sous chef" and the kids lead the way as much as possible. Depending on the age of the child, the meal can be become more or less complicated. My granddaughter was very proud of her appetizers. An adult will need to decide what help the child might need in cutting the baguette and using the stove. 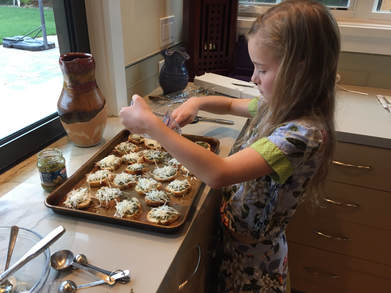 The only ingredients for these appetizers include a baguette, a small bottle of pesto, and Parmesan cheese. After slicing the baguette and putting it on a cookie sheet with parchment paper, my granddaughter put some pesto on each and grated cheese on top. Then with a little help from her "sous chefs" she watched the appetizers under the broiler until the cheese melted. These appetizers were definitely a great hit with every one. 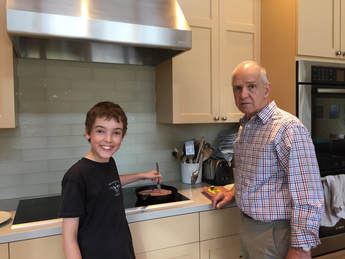 My grandson chose the main course and dessert; both of these recipes were a little more ambitious than I would have chosen myself. My recommenda-tion would be to have three or four recipes available so the kids could choose from them. However, though the recipes were ambitious, they were a great success. Everyone loved the peppers, sausage, and potatoes, which was a one pot recipe; we choose red and yellow peppers to make the dish more colorful. The lemon bars were a great hit and I did simplify the recipe we used just a little for my website. All the recipes are available on my website - "Cookingtogetherwithfriends.com" - Menu #8. Please comment, sharing an experience you've had cooking with your kids. Also, click on the website to see the rest of the recipes.
You'll love the aroma of the dish that you make "en papillote". "En papillote" is the term used by French cooks to describe food cooked in tightly sealed packets of parchment paper. There are taste benefits, health benefits, and presentation benefits for cooking this way. Since the food is sealed in a packet, it needs very little oil or additional fat to result in a flavorful dish. Though this method works with other foods as vegetables and meats, I like using this type of baking with fish. Fish can easily dry out when baked and lots of calories are added when fried, but the en papillote method keeps it very moist and when opened there is a wonderful aroma of the various spices and herbs that you've added. So how to begin. Since parchment paper comes in 15 inch rolls, paper pieces of 15 by 18 inches is a good size to make packets for individual portions of fish - I like 5-6 ounce pieces. After you have put the fish in the center of the paper, put your favorite herbs and spices on it, and then close the packets and seal the edges with two or three small folds. A terrific recipe I've made many times with great success is Salmon en Papillote. See the complete recipe at my site; cookingtogetherwithfriends.com   The Best Dinner Party Ever! Doesn’t that sound great! Trying to have such a party often comes with a great deal of stress and exhaustion. I have a plan that can minimize these problems and still result in a terrific party. What does this plan involve? Have your guests do the cooking!
Could that really work? Over many years my husband and I have had this type of party times great success. Most of the work involves getting the recipes that will work together and I have done that for you on my website. Though, I have many more menus which we have tried over the years, I have only recently started taking pictures at these parties and currently five menus are on the site. What do you need to try this? 1. First you need to choose some friends. I’ve found that lots of people will initially be intimated by the idea and say they don’t cook, but I’ve found everyone can chop and everyone gets goal of creating a good tasting dish. 2. Use the shopping list to purchase the necessary menu items. 3. Set up work stations in your kitchen. 4. Assign each guest their job and watch each guest get competitive and enjoy the resulting great food. For specifics- go to my website - Cooking together with Friends. |
Tricia Gregory, MA,RD/N A dietitian who is a foodie and loves a great dinner party with wonderful food and terrific friends. Archives
March 2022
Categories
|
 RSS Feed